Workspace Customization in ERPNext
by Anuradha Patil #erpnext hashtag#workspace hashtag#learning

Dashboard is typically the landing page for a user once they log into any business software. Setting up an intuitive and utility-oriented dashboard for the end-user is one of the key drivers by which any software roll-out champion can succeed at his or her job with user adoption when introducing new software to a team - Literarily a good dashboard can help make that first impression that can potentially make it a smoother ride for change management.
# ERPNext is a great cloud #ERP software that comes with almost all imaginable enterprise features shipped. That means - when you install ERPNext you get all the core ERP modules pre-installed.
This can be overwhelming for new users as they login, to see all modules and a lot more features and buttons that may not be relevant to their scope of work. That is why ERPNext offers the flexibility to configure user-specific workspace and dashboard, thus making the user experience a lot less cumbersome and make easy to use and adapt to the system.
This article explains in full detail the workspace customization of ERPNext.
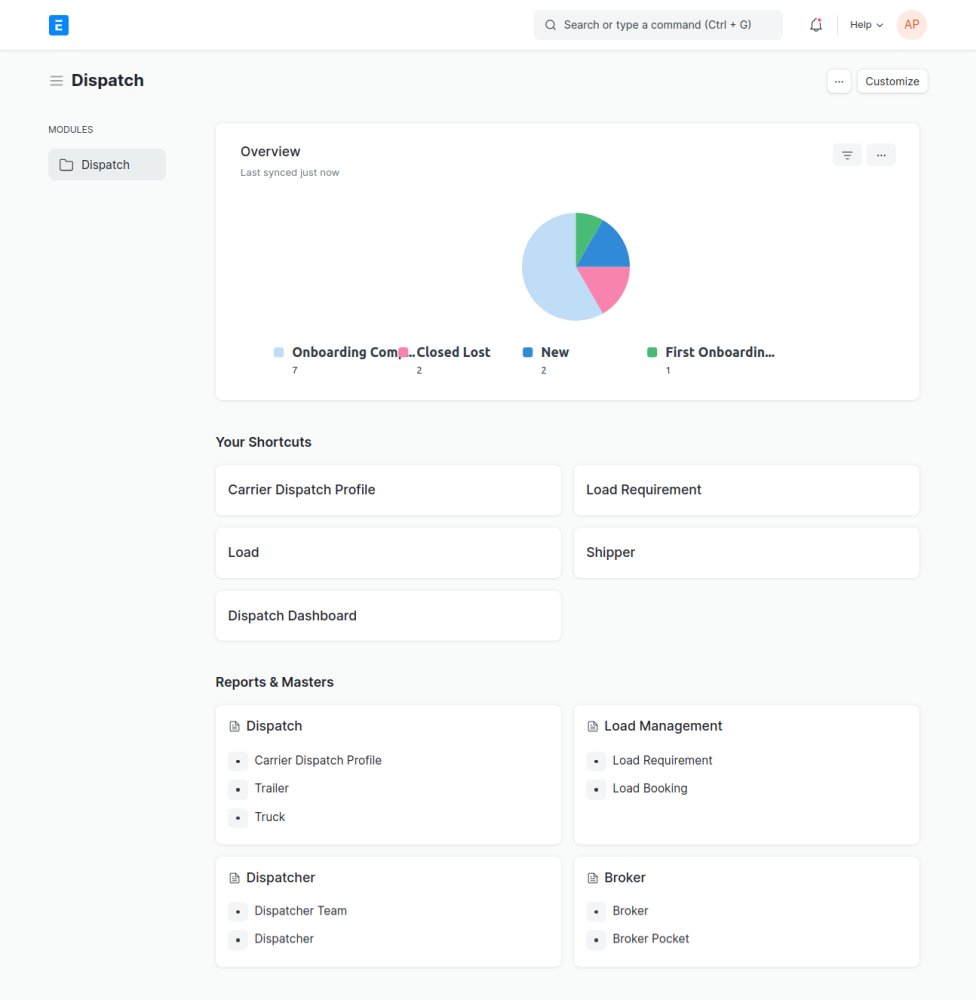
What is a Workspace in ERPNext? In ERPNext, the Workspace is a single-page layout, comprise of Shortcuts, Dashboard charts, Reports and Masters.
Why do we need a Workspace? ERPNext offers numerous modules such as Manufacturing, Healthcare, CRM, Accounting, etc. Accommodating all these modules and the features they contain in a single-screen view is not feasible. Therefore, in order to simplify and improve accessibility, Workspace are created. A Workspace in ERPNext represents a module, where vital graphs, reports, and essential doctypes are available with a single click.
Typically, Workspaces include the following:
A dashboard section that displays different types of charts.
A shortcut section where you can see frequently used doctypes, pages, and reports.
A master's section where all the reports and masters are grouped and listed.
How do we create a Workspace? Let's begin by creating a basic Workspace. Search “Workspace List” in the 'Awesome Bar', click on “Add Workspace” and follow the steps:
On the fresh workspace page, add a name for the workspace.
Choose a module for which you wish to create a Workspace. (It can be either a core module or a custom module)
Category - is where you what to place this Workspace. There are four different categories: Modules, Domains, Places, and Administration. This is basically the placement of workspace in the sidebar. The Administration section is usually where all the settings pages are located; the Module section is where core workspace are located; the Domain section is where different domain Workspace are located; similarly, Workspace for different locations can be created and placed under the Places category.
On the right side, you will see the following basic settings of the Workspace:
1.Is Standard - check this option, to add this workspace to the sidebar for all users.
2._Disable User Customization – _if this option is checked, users can not customize this workspace.
3.Extends Another Page: check this option if, creating an extended version of the existing workspace.
4.Pin to Top: This option pins the Workspace at the top of the list.
5.Pin to Bottom: This option pins the Workspace at the bottom of the list.
Dashboard: The dashboard allows you to add pie charts, bar charts, line charts, doughnut charts, etc. You will be able to get an overview of trends from this.
Shortcuts: In the shortcuts section, you will be able to add frequently used Master, Reports, and Pages for easy and quick access.
Links: You can group different Master, Reports in this section and list them. You can see the connections and dependencies clearly by grouping these together.
How do we create Dashboard Charts?
A dashboard chart displays various trends graphically, which gives you a quick overview of all the information. Before we add these Dashboard charts to the workspace, we need to first create them. To add a Dashboard Chart, search “Dashboard Chart” in “Awesome Bar” and add new.
On the creation of a new Module, a corresponding workspace can be created for easy access. With all the shortcuts and dashboard charts.
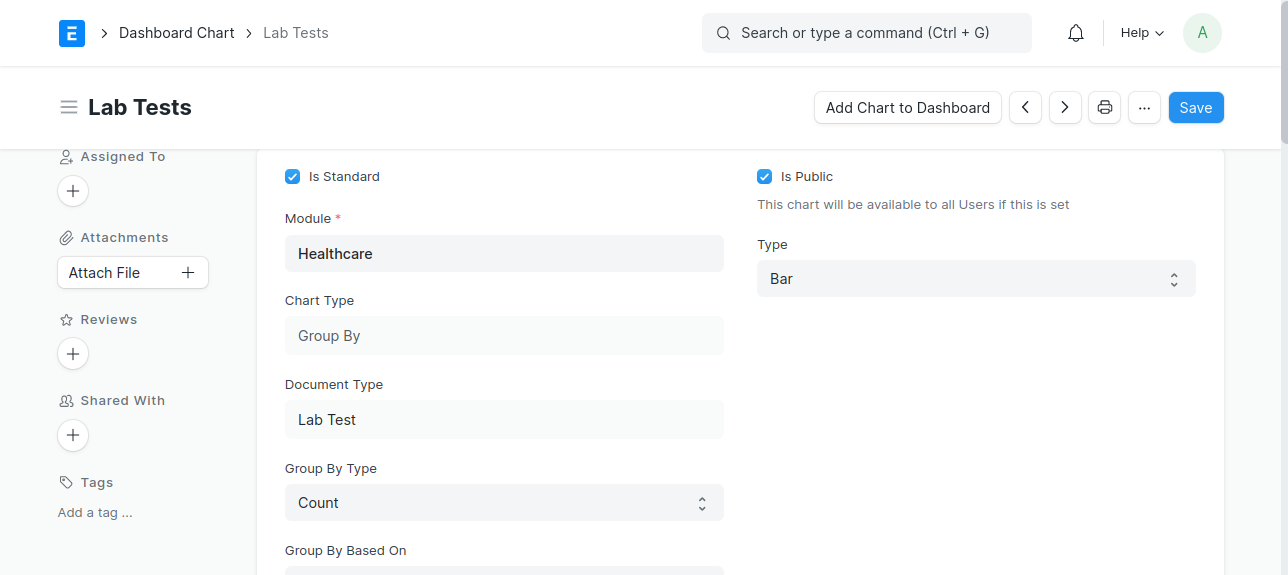
Steps: Select the desired Module in the Module field.
Chart Type - charts can be created based on reports, the sum of various factors or can be custom-made.
Type - select the graph type, i.e. Bar, Line, Pie, Donut, etc.
Time series - you can also create it for a specific time period by checking this.
Filters - Filters are available for filtering the chart by different parameters, by selecting the appropriate filter.
Once the Dashboard is created, it can be selected in the ‘Dashboard’ section of a Workspace.
Module Onboarding:
An onboarding process can be created for any module, that includes all the major activities which need to be performed by the user so that the users are fully onboarded to use all the features and functionalities of the module or system in question.
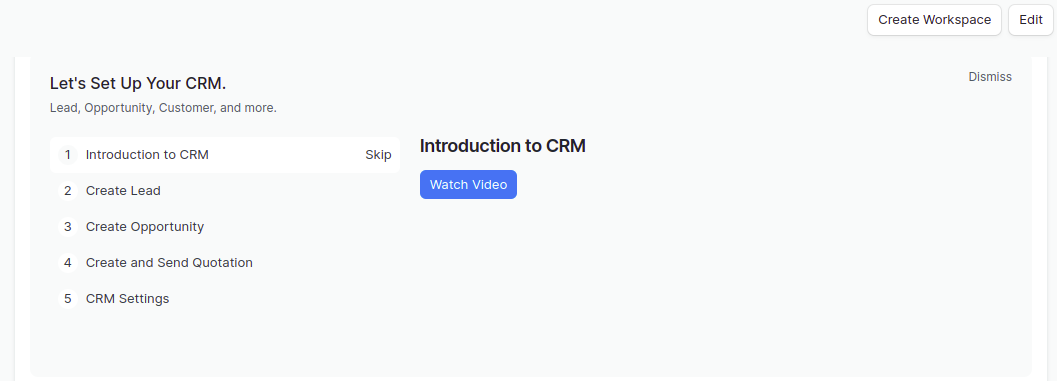
You will find a set of steps listed on the top of any core module, such as CRM, Accounting, Buying, HR, etc. Steps can either be described with a description of what to do or a link can be provided to a video explaining the action.
How to create Onboarding?
It is recommended that you create the Onboarding steps before creating the Onboarding. An onboarding step includes a description, an action to perform, and a link to which it should be redirected.
Onboarding step:
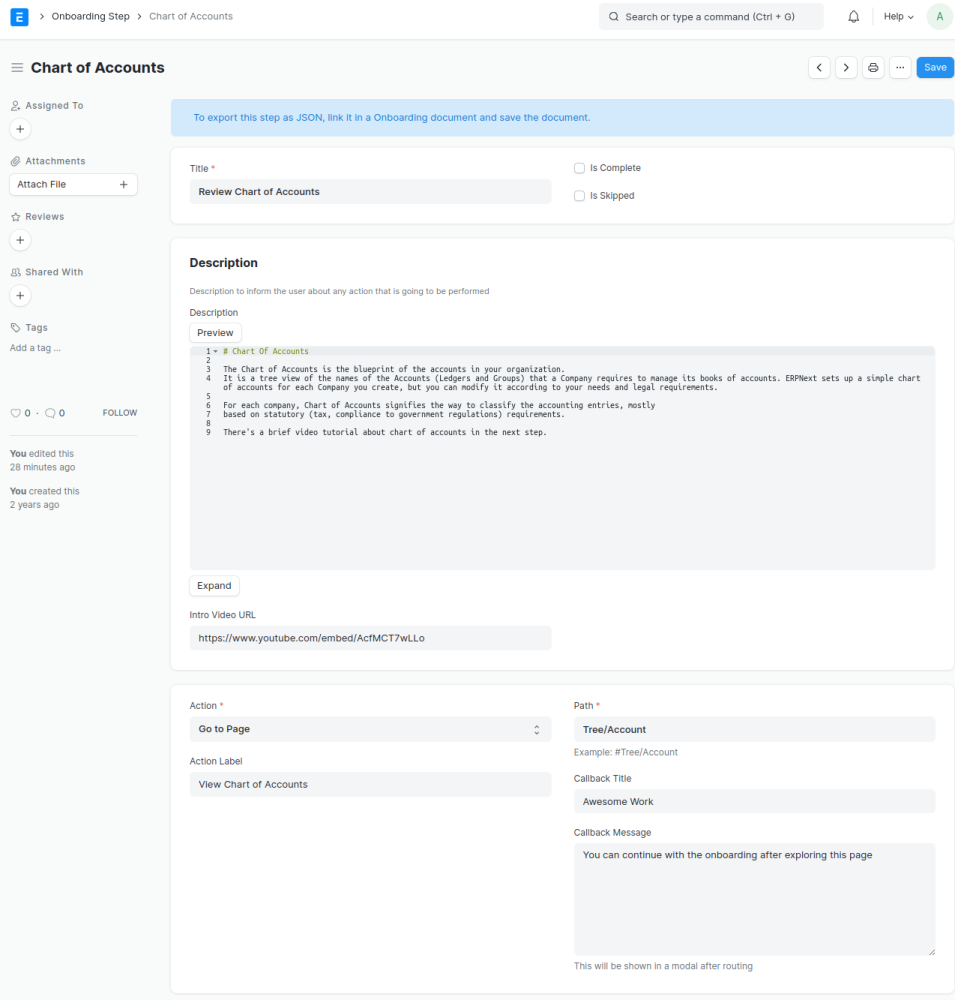
1.Add a preferred title and description in the respective field.
2.Intro Video URL: Here, we can provide a link to redirect this step to a video.
3.Action: Select desired action, i.e ‘Go to Page’, ‘Create Entry’,’ Watch a Video’, etc.
4.Path: Define Redirecting path here.
5.Callback Title & Callback Message: this message will be displayed in a popup once the page is redirected.
Onboarding: Once all the onboarding steps are created, we will create onboarding, and rearrange the steps in an orderly manner.
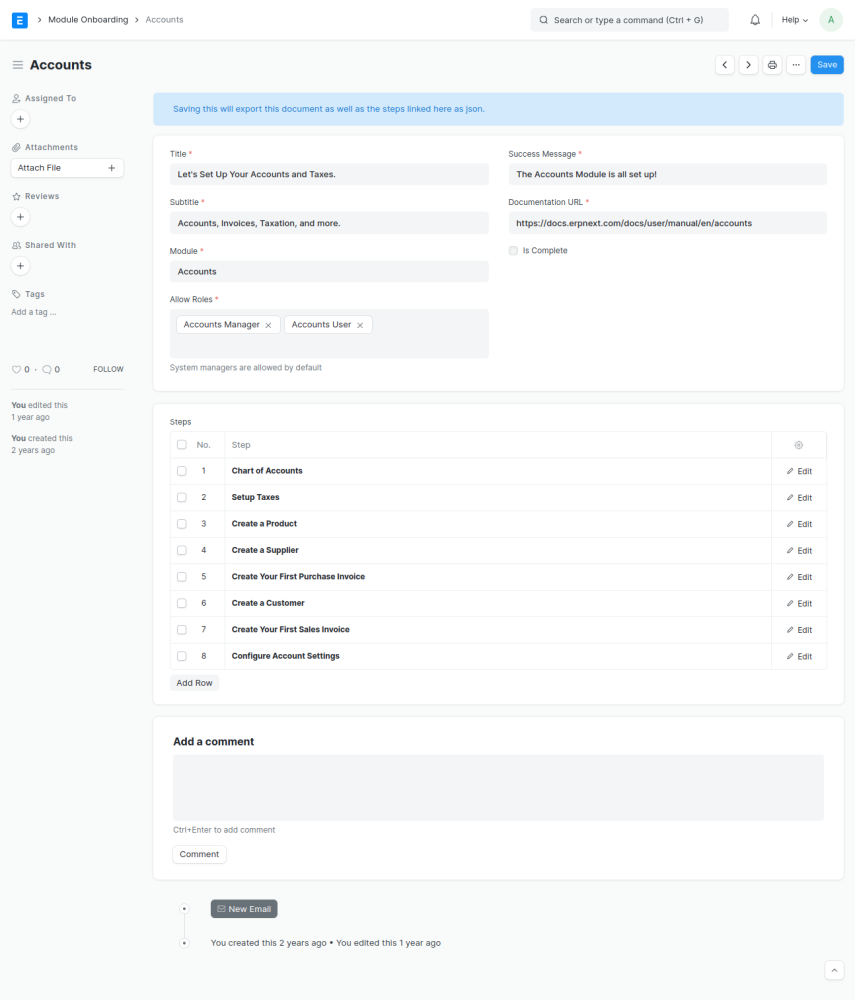
1.Go to: Module Onboarding > New.
2.Add Title, Subtitle, and select the Module.
3.Documentation URL: This should be the link to the Module/System documentation, where all the features are explained.
4._Success Message: _this message will be displayed after completing the onboarding.
We will add this onboarding page to our workspace by going to the workspace where we wish to add it, finding the field "Onboarding", and selecting the onboarding we just created.
Can a Workspace be customized?
Workspace can be customized and personalized according to your requirements. Users can create and customize their own workspace based on their user permission.
Following are some customization that help in personalizing the Workspace:
Note: To edit the existing workspace or to add a new workspace the Developer mode should be on.
1.Visibility of Modules in the sidebar:
You can control the Visibility of Workspaces in the sidebar, for different user groups.

- Addition: You can add a Workspace for a custom-created module, and check “Is Standard” to add it as a default Workspace for all the users.
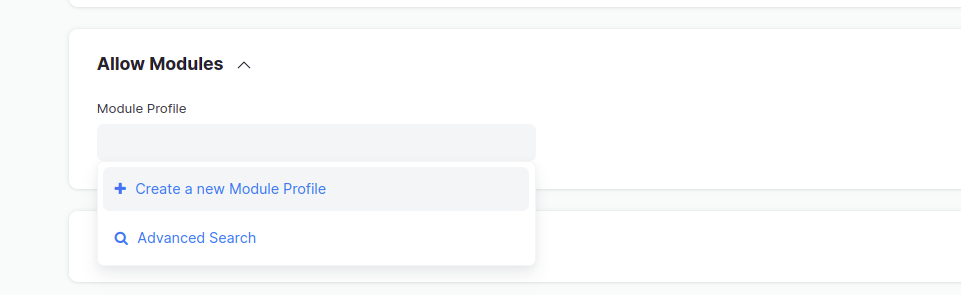
Removal: To Remove Workspace visibility from the sidebar, go to the user search for “Allow Module” and choose the appropriate Module Profile for that user. Navigation - User >> Allow Module >> Create a Module Profile.
Creation of Module Profile: The creation of a Module Profile for each user group can be done by selecting the required modules and adding them.
2.Adding Count and Colour code in shortcuts:

Against each shortcut a count for a specific item can be displayed by the following settings:
Go to a specific Workspace, choose an appropriate shortcut and edit it.
Add appropriate code in Count Filter and select the colour of your choice as shown.
Our team found out a bug with the colour feature for the above - and we raise the PR for the bug which was merged gracefully by the Frappe project maintainers.
3.User-specific Workspace:
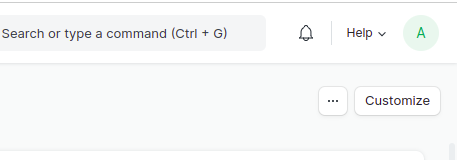
Customization of your own workspace can be done by clicking on the "Customize" button at the top right corner.
Here you can add or remove shortcuts, and dashboards of your choice.
All these above-mentioned customizations that is done on your Workspace will be visible only to you the user. Should you require customization for all users, this needs to be done at the Workspace list level.
With this I hope we are fully covered with the rich features and functionalities that Frappe Workspace affords us with to give the end-user a great user onboarding experience.
#ERPNext #ERPNextHelp #Workspace #WorkspaceCustom #blog #steps #changemanagement
Atul-Kuruvilla
Github: pythonpen
No comments yet. Login to start a new discussion Start a new discussion